
Is your water bill climbing higher every summer? Do you wrestle with a heavy hose after a long day, only to see some plants wilt while others drown? You’re not alone. Traditional watering is a constant battle of inefficiency and guesswork for countless gardeners and small-scale growers.
But what if there was a more innovative way? A method that delivers the perfect amount of water exactly where needed, saving you money, time, and the heartbreak of unhealthy plants. There is, and it’s called drip irrigation.
This guide is your one-stop resource for understanding everything about drip irrigation. We’ll go beyond simple definitions to give you a complete picture—from how it works and costs, to how you can install your own system this weekend and keep it running flawlessly for years.
The Core Concept: What Exactly Is Drip Irrigation?
Before diving into the components, costs, and how-to guides, let’s understand the fundamental idea clearly. Many people think of drip irrigation as just another way to water plants, but seeing it as a complete, highly efficient delivery system is more accurate.
A Simple Analogy: The “IV Drip” for Your Garden
Imagine a patient in a hospital. To deliver medicine most effectively, doctors use an intravenous (IV) drip—a slow, steady, and direct supply into the bloodstream. Drip irrigation operates on the same principle for your plants.
Instead of flooding the garden with a hose or sprinkler (like making a patient drink a gallon of water all at once), a drip system provides a slow, consistent trickle of water directly to the base of each plant. This water seeps slowly into the soil and goes straight to the root zone, where the plant absorbs water and nutrients. It’s a precise, methodical approach that eliminates the “boom and bust” cycle of conventional watering.
How It Works: A Visual Breakdown from Faucet to Root
At its core, a drip system takes water from your source (like a spigot or pump) and uses a network of tubes to deliver it in small, controlled amounts. The key is that it operates at a low pressure and a low flow rate.
This slow delivery is revolutionary because it virtually eliminates the two most significant sources of water waste: surface runoff and evaporation. With sprinklers, much water is lost to the wind and sun before it touches the ground. With drip irrigation, nearly every drop is accounted for and put to work nourishing the plant.
The Payoff: 7 Key Benefits for Your Garden or Farm
So, why should you care about drip irrigation? The answer goes far beyond just saving a bit of water. Adopting this method creates a cascade of positive effects for your plants, schedule, and wallet.
Benefit 1: Unmatched Water Efficiency
Data from university studies and government bodies like the U.S. Environmental Protection Agency (EPA) show that well-designed drip systems are 90% or more efficient than sprinklers, which often waste up to 50% of the water they use. This translates directly into lower water bills and responsible water stewardship, especially in dry climates.
Benefit 2: Healthier Plants, Higher Yields
Drip irrigation reduces the risk of fungal diseases like powdery mildew by delivering water directly to the roots and keeping foliage dry. Consistent moisture also eliminates plant stress, leading to more vigorous growth, higher-quality flowers, and abundant fruit and vegetable yields.
Benefit 3: Massive Time & Labor Savings
Once a timer is attached, a drip system becomes a fully automated “set it and forget it” solution. This frees up countless hours you would have spent hand-watering, allowing you to focus on other gardening or farm management aspects.
“My water bill dropped by 40%, which was great. But the real game-changer was getting my weekends back. The system just works.” – Sarah L., Home Gardener
Head-to-Head: Drip vs. Sprinklers vs. Soaker Hoses
| Feature | Drip Irrigation | Sprinklers | Soaker Hoses |
|---|---|---|---|
| Water Efficiency | Very High (90%+) | Low to Medium (50-70%) | Medium (70-80%) |
| Targeting | Pinpoint precision to roots | Broadcast waters everything | Along the hose line |
| Weed Growth | Minimizes | Encourages | Moderate |
| Foliage Disease | Reduces risk | Increases risk | Low risk |
| Best For | Vegetable gardens, orchards, containers | Lawns, large uniform areas | Dense flower beds, straight rows |
| Initial Cost | Medium | Low to Medium | Low |
The Big Question: Is Drip Irrigation the Right Choice for YOU?
While it’s a powerful tool, drip irrigation isn’t a one-size-fits-all solution. Here’s an honest look at where it excels and where you might consider alternatives.
Ideal Scenarios: Where Drip Irrigation Shines
- Vegetable Gardens & Raised Beds: Delivers water precisely to each plant, maximizing growth.
- Orchards & Fruit Trees: Perfect for establishing deep root systems.
- Landscapes with Shrubs & Perennials: Easily adaptable to irregularly spaced plants.
- Container Gardens & Balconies: Automates watering for potted plants.
- Windy or Sloped Areas: Eliminates water waste from wind drift and runoff.
- Areas with Water Restrictions: The most effective way to comply with regulations while keeping your garden alive.
An Honest Look: When to Consider Alternatives
There are a few situations where drip irrigation may not be the best fit:
- For Seeding New Lawns: Sprinklers are more effective for germinating grass seed over a large, uniform area.
- For Frost Protection: Overhead sprinklers can coat plants in a protective layer of ice during a frost event; drip cannot do this.
- Extremely Low-Budget, Temporary Setups: For a small, temporary garden, the initial investment might not be justified compared to hand-watering.
Decision Time: A Quick Quiz to Help You Choose
- Is saving water a top priority for you? (Yes/No)
- Do you grow plants in rows, containers, or distinct landscape beds? (Yes/No)
- Do you want to reduce weed growth and plant disease? (Yes/No)
- Would you value an automated watering schedule? (Yes/No)
Drip irrigation is likely an excellent investment if you answered “Yes” to two or more of these questions.
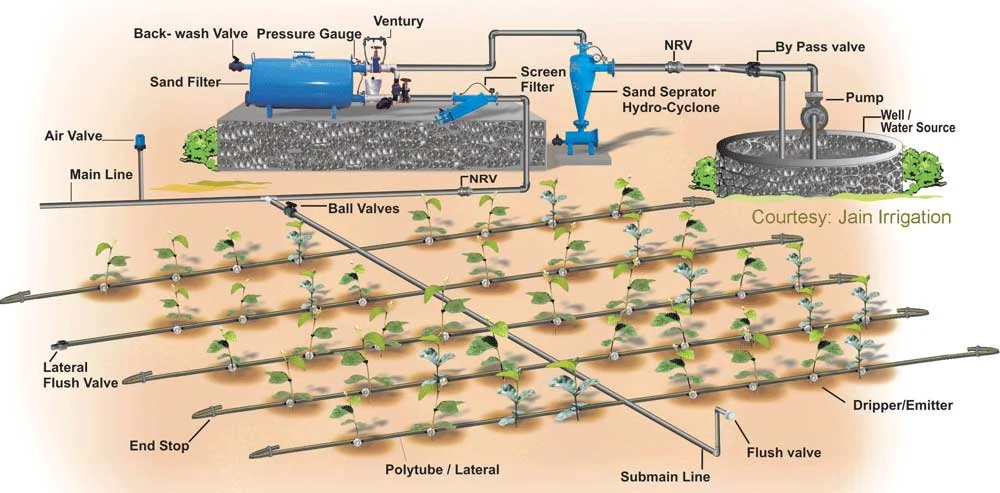
Anatomy of a System: The 4 Essential Component Groups
A drip system might seem complex, but it’s a collection of simple parts working together. Let’s break it down into four main groups.
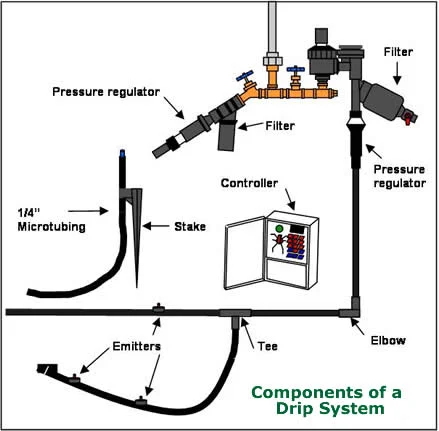
Group 1: The Head Assembly (The “Control Center”)
This is where the system connects to your water source. It typically includes:
- Backflow Preventer: An essential safety device that stops irrigation water from siphoning back into your drinking water supply, a best practice that industry leaders like the Irrigation Association recommend.
- Filter: Crucial for removing sediment that can clog emitters.
- Pressure Regulator: Reduces your home’s water pressure to the low level the drip system requires.
- Timer: Automates the entire process.
Group 2: The Delivery Network (The “Highway”)
This is the tubing that carries water throughout your garden.
- Mainline Tubing: Larger diameter tubing (1/2” or 3/4”) that acts as the main artery.
- Micro-Tubing: Smaller diameter tubing (1/4”) branches off the mainline to reach individual plants.
- Fittings: Connectors, tees, and elbows shape the network.
Group 3: The Emitters (The “Business End”)
These are the small devices that actually release the water. Choosing the right one is key.
- Drip Emitters: Deliver water at a specific rate (e.g., 1 gallon per hour) to individual plants.
- Micro-Sprayers: Used for ground cover or closely spaced plants.
- Your choice depends on your soil: As agricultural experts from institutions like the University of California advise, sandy soil requires higher flow rates to prevent water from dropping straight down. In contrast, clay soil needs very low flow rates to allow for slow absorption.
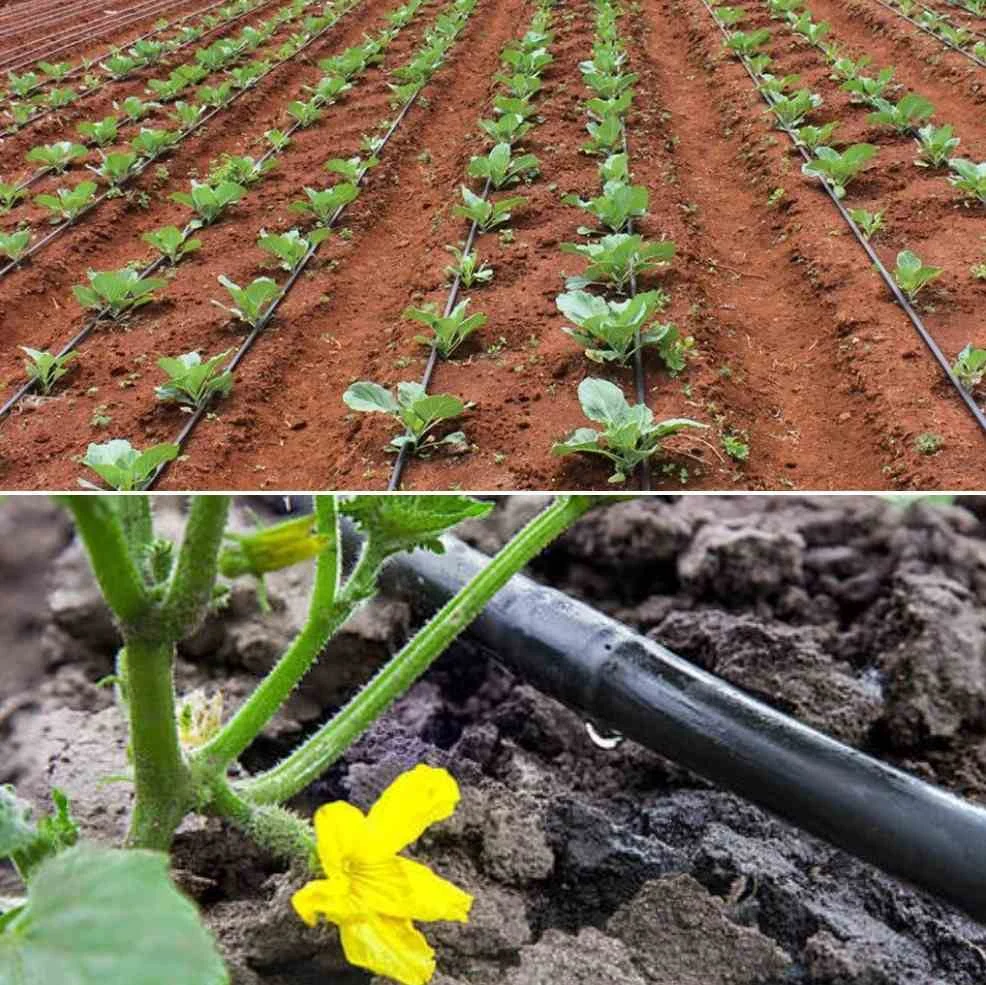
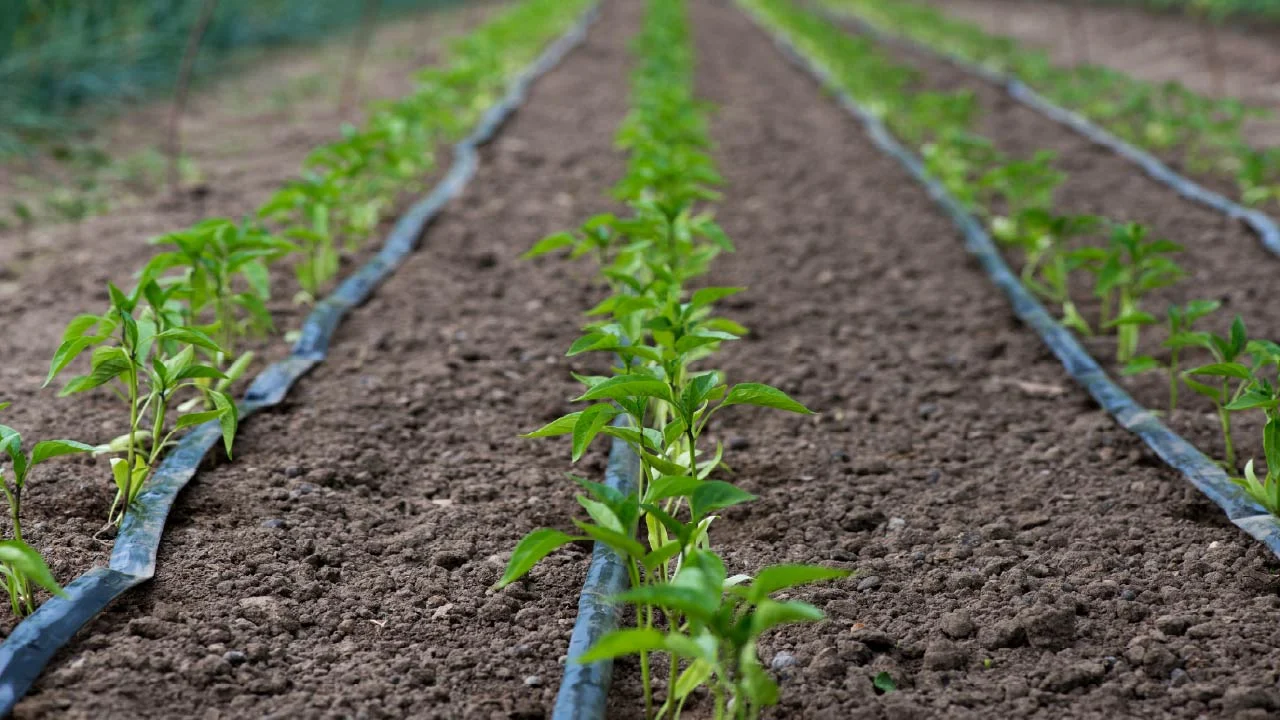
Special Focus: Drip Tape for Agriculture
For larger, row-based applications like market gardens and small farms, drip tape is an incredibly efficient and cost-effective option. It’s a thin-walled tube with emitters pre-installed at regular intervals. For example, products like the OKD Agro 16mm Drip Tape utilize an advanced anti-clog flat emitter design, making them a reliable choice for maximizing yields in vegetable farming.
The Bottom Line: Understanding the Costs & True Value
The most common question is: “How much will this cost?” The answer depends on quality and scale, but the long-term value often outweighs the initial price tag.
Sample Budget: Costing a 100 sq. ft. DIY Garden System
For a typical 10’x10’ home vegetable garden, a complete, good-quality DIY kit will likely cost between $50 and $100. This includes the head assembly components, 100 feet of tubing, and a variety of emitters.
The “Cheap Kit” Trap: Why Quality Pays in the Long Run
It can be tempting to buy a $20 all-in-one kit. However, these often use low-grade plastic that degrades in the sun after one season and contain non-pressure-compensating emitters that water unevenly. Investing more in UV-resistant tubing and high-quality components means you won’t replace the entire system next year.
A Simple ROI Framework for Small Farms
For commercial growers, the calculation is different. The initial investment per acre can range from $500 to over $2,000. To calculate your Return on Investment (ROI), consider:
- Savings: (Reduced Water Bill + Reduced Labor Costs)
- Gains: (Increased Yield Value + Improved Crop Quality Value)
- ROI = (Savings + Gains) / Initial Investment. The system can pay for many high-value crops within 1-3 seasons.
Your First Project: A 5-Step DIY Installation Guide
Installing a basic drip system is a satisfying weekend project that requires no special plumbing skills.
- Plan & Sketch: Draw a simple map of your garden, noting your water source and the plants you want to water. This will be your blueprint.
- Gather Your Parts: Purchase a starter kit or individual components based on your sketch. Don’t forget a pair of tubing cutters and a punch tool.
- Assemble the Head Unit: Screw the backflow preventer, filter, pressure regulator, and timer onto your spigot.
- Roll Out Tubing: Lay out your mainline tubing according to your plan. Let it sit in the sun for an hour to make it more flexible and easier to work with.
- Install Emitters & Test: Punch holes in the mainline and insert your emitters or micro-tubing. Turn the water on for a few minutes to flush out any dirt before capping the end. Check for leaks and ensure all emitters are working.
Pro Tip: The “Invisible” System for the Aesthetically-Minded Gardener
Worried about unsightly black tubes? Once your system is laid out and tested, cover the tubing with a 2-3 inch layer of mulch (like bark chips or straw). This hides the system completely, conserves even more moisture, and suppresses weeds.
A Practical Field Guide to Troubleshooting & Maintenance
A well-maintained drip system is incredibly reliable. Here’s how to solve the few problems you might encounter.
The 3 Most Common Problems & Their Solutions
| Problem | Likely Cause | Solution |
|---|---|---|
| 1. Clogged Emitter | Debris from the water source. | Prevention: Always use a filter! Fix: Remove the emitter and clean it, or replace it. The best preventative measure is using components that resist clogging, such as high-quality anti-clog drip tape. |
| 2. Leaks at Fittings | Poor connection or cut. | Ensure tubing is cut cleanly and pushed firmly over the fitting. Use clamps if necessary. |
| 3. Low Pressure at End | The line is too long or has too many emitters. | A single run of 1/2” tubing shouldn’t exceed 200 feet. Split your system into multiple smaller “zones” if needed. |
Frequently Asked Questions (FAQ)
1. How long and how often should I run my drip system?
This depends heavily on your soil, climate, and plants. A general starting point is 2-3 times a week for 30-90 minutes. The goal is deep, infrequent watering. Check the soil 5-6 inches down to see if it’s moist.
2. Is drip irrigation better than a soaker hose?
For precision and durability, yes. Drip systems allow you to control the exact amount of water delivered to each plant. They are made from more durable, UV-resistant materials. Soaker hoses are cheaper but water less evenly and degrade faster.
3. Can you connect a drip system to a rain barrel?
Yes! This is called a gravity-fed system. You will need a system with no pressure regulator and large-orifice emitters, as the pressure will be very low.
4. Is it challenging to install drip irrigation yourself?
Not at all. If you can assemble LEGOs, you can install a drip system. It’s mostly cutting tubing and pushing fittings together.
5. What is the main disadvantage of drip irrigation?
The primary disadvantage is the risk of clogging if you don’t use a proper filter. This is why filter maintenance is essential to keeping your system healthy.
You now have a complete understanding of what drip irrigation is and how it can revolutionize the way you care for your plants. It’s more than just an irrigation method; it’s an investment in the health of your garden, the conservation of a precious resource, and the value of your own time.
Ready to take the next step?
- For the Home Gardener: Explore our all-in-one DIY Drip Irrigation Kits to get started this weekend.
- For the Commercial Grower: Discover the efficiency of our OKD Agro Anti-Log Drip Tape or contact our specialists for a free consultation on a system tailored to your farm.