
Wasted water, skyrocketing utility bills, endless hours spent wrestling with sprinklers, and the constant battle against weeds and disease—if this sounds familiar, you’ve come to the right place. Whether you’re tending a backyard garden, managing a small organic farm, or installing professional-grade irrigation, the challenge is the same: delivering water to your plants as efficiently and effectively as possible.
This guide is designed to be your definitive resource for one of the most powerful tools in modern irrigation: drip tape. Here at Okdagro, we’ve spent years engineering and supplying drip irrigation solutions for growers of all sizes. In this guide, we’re sharing everything we’ve learned to help you build a system that saves you water, time, and money while dramatically improving your crop health and yield.
What Is Drip Tape and Why Is It a Game-Changer?
At its simplest, you can think of drip tape as a thin-walled, flat hose that delivers water directly to your plants. But unlike a simple garden hose, it’s engineered with remarkable precision.
A Simple Definition: More Than Just a Flat Hose
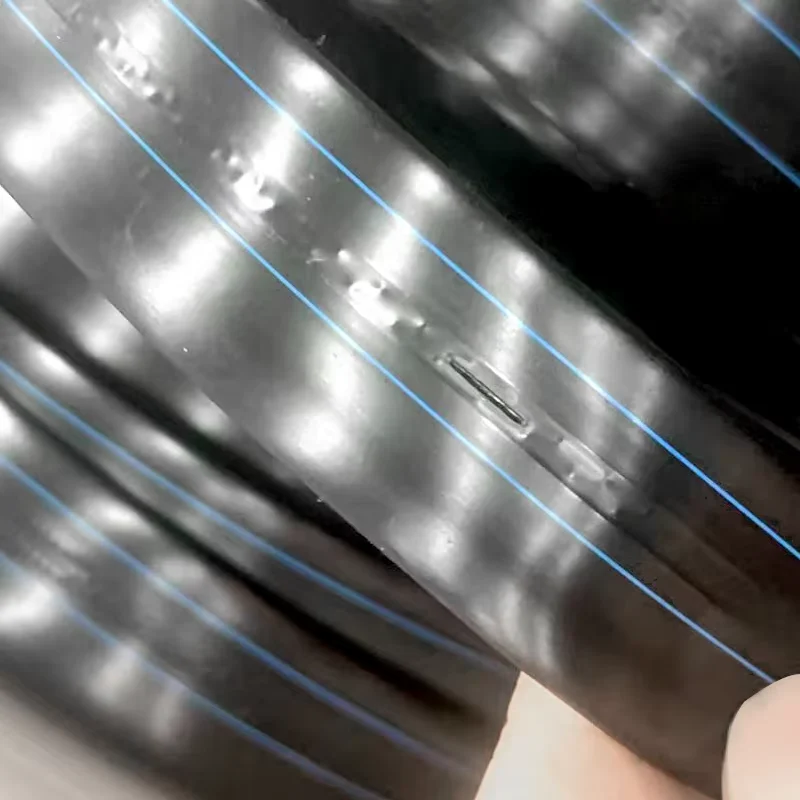
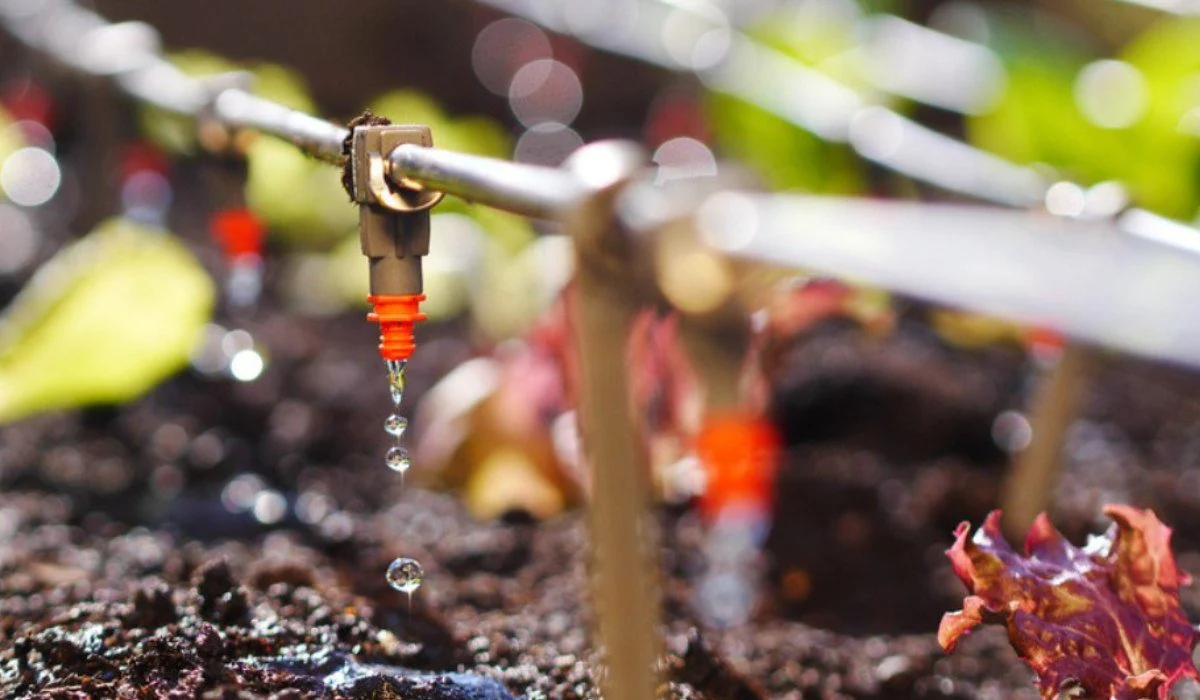
Drip tape is a polyethylene tube that is manufactured flat, making it easy to roll out and store. The real magic, however, is on the inside: at perfectly spaced intervals, the tape contains tiny, laser-cut outlets called emitters. When the system is filled with water at a low pressure (typically 8-15 PSI), these emitters deliver water drop by drop, at a slow and consistent rate, directly into the soil at the root zone. This slow, targeted delivery is the foundation of its incredible efficiency.
The 5 Core Benefits Driving Modern Farming and Gardening
Switching to a drip tape system isn’t just a minor upgrade; it’s a fundamental shift in how you manage water, leading to five transformative benefits:
- Radical Water Efficiency: This is the most celebrated benefit. By delivering water directly to the roots, you can use up to 70% less water compared to traditional overhead sprinklers. You lose virtually nothing to wind, runoff, or surface evaporation. Every drop counts.
- Healthier Plants, Less Disease: Overhead watering leaves plant foliage wet, creating a perfect breeding ground for fungal diseases like powdery mildew and blight. Drip tape keeps the leaves, stems, and fruit perfectly dry, dramatically reducing disease pressure and the need for costly fungicides.
- Increased Yield and Crop Uniformity: Plants thrive on consistency. By providing a steady supply of water directly to their roots, you eliminate the stress cycle of too wet or too dry. This leads to more uniform growth, better fruit development, and ultimately, a higher marketable yield.
- Effortless Weed Control: Weeds need water to grow. Drip tape only waters a narrow band along your crop row, leaving the areas in between dry. This natural form of weed suppression means less time spent weeding and less competition for your valuable crops.
- Saves Time, Labor, and Money: Once installed, a drip tape system can be automated with a simple timer. This eliminates the daily chore of hand-watering or moving sprinklers. The savings on your water bill, combined with reduced labor and input costs (fertilizer, pesticides), create a powerful economic advantage.
Beyond Water Savings: The Hidden Gains in Yield and Crop Health
While impressive water savings are what initially attract most growers to drip tape, the true financial impact often comes from secondary, compounding gains. For commercial growers, a 15% reduction in fungicide application or a 10% increase in first-quality, marketable fruit due to reduced water stress can easily outweigh the savings on the water bill. We will break down exactly how to calculate this complete return on investment for your own operation later in this guide.
Drip Tape vs. Drip Line vs. Soaker Hose: Making the Right Choice
It’s easy to get these terms confused. Here’s a clear breakdown to help you select the right tool for the job.
| Feature | Drip Tape | Drip Line (Drip Tubing) | Soaker Hose |
|---|---|---|---|
| Structure | Thin-walled, flat tape with pre-installed emitters | Rigid, round polyethylene tube with emitters | Porous, rubber-like hose that “weeps” water |
| Best Use Case | Long, straight rows of vegetables, berries, hemp, or other row crops. | Perennials, shrubs, trees, irregularly shaped garden beds. | Short runs in small home gardens, new seedbeds. |
| Cost | Lowest per foot. | Moderate. | Low to moderate. |
| Lifespan | 1-7 years, depending on wall thickness and use. | 10+ years. | 1-3 years, prone to clogging and sun damage. |
| Installation | Very fast for long rows. Requires specific fittings. | More time-consuming to lay out and secure. | Very simple, connects directly to a garden hose. |
| Watering Precision | Highest. Emitters provide uniform flow. | High. Emitters are pressure-compensating. | Lowest. Water distribution can be very uneven. |
The Bottom Line: For any kind of row-crop agriculture or large-scale gardening, drip tape is the undisputed professional standard due to its cost-effectiveness and precision. For permanent landscape plantings, drip line is the better choice. Soaker hoses are a budget-friendly but inefficient option for small, temporary setups.
Blueprint for Success: Designing Your Drip Tape System
A successful system starts with a good plan. Follow these steps to design a system tailored to your needs.
Step 1: Mapping Your Area & Calculating Material Needs
- Measure: Get the exact length of each row you plan to irrigate. Sum these numbers to find the total footage of drip tape you need.
- Map Your Water Source: Identify where your water source (spigot, well pump, etc.) is located. This will determine the length of your mainline tubing.
- Calculate Total Flow Rate: Find your drip tape’s flow rate in gallons per hour (GPH) per 100 ft. Multiply this by the total footage you have, then divide by 100.
- Example: 500 ft of tape rated at 45 GPH/100ft = (500/100) * 45 = 225 GPH.
- Ensure this number does not exceed the capacity of your water source.
Step 2: The Core Components Checklist
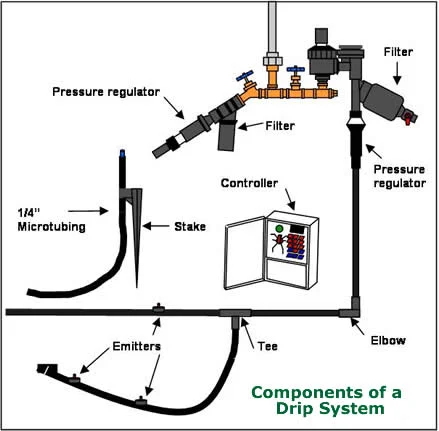
Every robust system needs these parts:
- Backflow Preventer: Stops irrigation water from siphoning back into your main water supply.
- Filter: This is non-negotiable. A 150-200 mesh screen filter is essential to prevent emitters from clogging.
- Pressure Regulator: Drip tape operates at low pressure (8-15 PSI). A regulator steps down your home or farm’s water pressure to prevent the tape from bursting.
- Mainline Tubing: This is the backbone that carries water from the source to the rows (usually 1/2″ to 1″ poly tubing).
- Drip Tape: The heart of the system.
- Fittings & Valves: Connectors, row start valves, and end plugs to control and terminate the lines.
Choosing the Right Wall Thickness (Mil): A Decision Matrix
“Mil” is a measure of thickness (1 mil = 1/1000th of an inch). Choosing the right one is crucial for balancing cost and durability.
| Wall Thickness | Expected Lifespan | Recommended Use Case | Soil Condition | Installation Forgiveness |
|---|---|---|---|---|
| 6-8 Mil | 1-2 Seasons | Single-season crops like vegetables, melons. Ideal for experienced installers. | Well-tilled, sandy or loamy soils. No rocks. | Low. Prone to stretching or puncture during installation. |
| 10 Mil | 2-3 Seasons | A good all-purpose choice for small farms and serious gardeners. | Most soil types, some small stones are okay. | Moderate. A good balance of flexibility and strength. |
| 15 Mil | 3-7+ Seasons | Multi-year crops (berries), subsurface installation (SDI), or where tape is retrieved yearly. | Rocky soils, heavy clay. Where durability is paramount. | High. Resists damage from installation and mechanical cultivation. |
Matching Emitter Spacing to Your Soil and Crop Type
- Sandy Soil (Fast Draining): Water spreads downwards more than sideways. Choose closer spacing (4-8 inches) to ensure a continuous wet strip.
- Loam/Clay Soil (Slower Draining): Water spreads wider. You can use wider spacing (8-12 inches).
- For continuous rows of closely planted crops like carrots or lettuce, closer spacing is best. For widely spaced plants like pumpkins or tomatoes, you can align plants with emitters.
Special Design Cases: Gravity-Fed and Subsurface (SDI) Systems
- Gravity-Fed Systems: Yes, you can run drip tape on a low-pressure gravity system! You’ll need a water tank elevated at least 10 feet above the field. Omit the pressure regulator but keep the filter. Maximum run lengths will be shorter.
- Subsurface Drip Irrigation (SDI): Burying drip tape 2-6 inches deep can further boost water efficiency. For this, you must use a thicker wall tape (15 mil) to withstand soil abrasion and prevent root intrusion.
Field Guide: How to Install Drip Tape Like a Pro
Installation is faster than you think. Here’s how to do it right.
Pre-Installation Checklist: The 5 Things to Do First
- Prepare your soil and beds.
- Assemble your “head assembly” (backflow preventer, filter, regulator).
- Flush the mainline tubing before connecting any drip tape to clear out debris.
- Lay out the drip tape with the emitters facing up to reduce clogging.
- Don’t connect the tape yet!
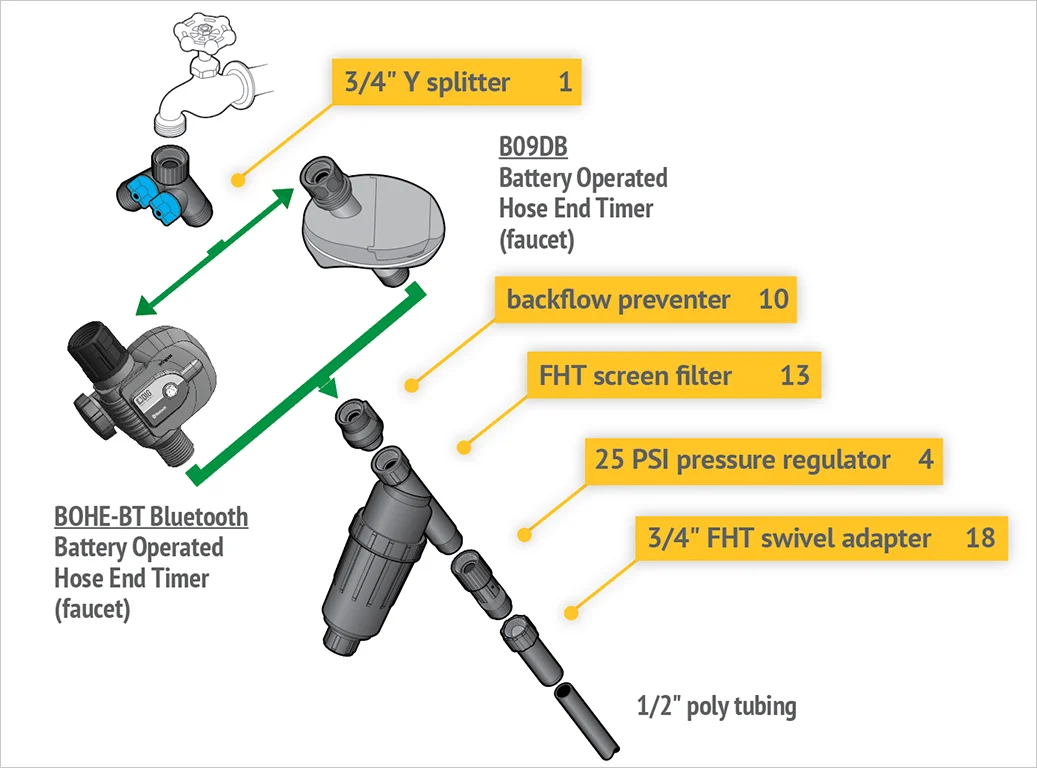
Path A: For the Home Gardener (Connecting to a Spigot)
- Connect your head assembly directly to your spigot or garden hose timer.
- Run your mainline poly tubing across the top of your garden rows.
- Use a punch tool to make a hole in the mainline where each row starts.
- Insert a row start valve/fitting into each hole.
- Attach your drip tape to the fitting. Secure it with a gentle wiggle.
- Run the tape down the row and close the end with an end plug or by folding and sleeving it.
Path B: For the Commercial Grower (Connecting to Layflat or PVC)
The principle is the same but on a larger scale. Your head assembly will be installed after your main pump. You’ll run a larger diameter mainline (PVC or Layflat hose) as a sub-main. Use specialized fittings to connect your drip tape rows to the sub-main.
Pro-Tips for a Leak-Free System That Lasts
- Don’t pull or stretch the tape during installation. This can damage the emitters.
- Secure the tape with soil or landscape staples every few feet to prevent wind from moving it.
- Before turning on the water for the first time, open the end caps of all lines to flush out any dirt from installation.
Operating & Maintaining Your System for Peak Performance
A little care goes a long way.
The Golden Rule of Drip Irrigation: Watering Schedules
Water longer and less frequently. The goal is deep watering to encourage deep root growth. Instead of watering for 15 minutes every day, try watering for 60-90 minutes every 2-3 days. Check the soil 5-6 inches deep to see if your schedule is effective.
Fertigation 101: Safely Feeding Plants Through Your System
Fertigation (applying fertilizer through irrigation) is a huge advantage of drip tape.
- Use only 100% water-soluble fertilizers. Any granular or suspended material will clog emitters.
- Install a fertilizer injector (like a Venturi injector) after your filter to protect it.
- Always run plain water through the system for 15-20 minutes after fertigating to flush any remaining fertilizer from the lines.
The Anti-Clog Protocol: A Zero-Failure Maintenance Plan
Clogging is the #1 enemy of any drip system. Understanding the threat is the key to preventing it. Modern systems like Okdagro’s 16mm Anti-Clog Drip Tape use advanced turbulent flow path emitters, but maintenance is still crucial for long-term reliability.
- Physical Clogging (Sand, Silt): Your filter is your only defense. Clean it weekly or more often if your water source is dirty. Regular line flushing (opening the end caps under pressure) is also essential.
- Biological Clogging (Algae, Slime): This happens when water sits in the lines in the sun. If your water source is a pond or well, periodic shock treatments with an approved oxidizing agent may be necessary.
- Chemical Clogging (Mineral Buildup): If you have very hard water (high in calcium), mineral deposits can form. Lowering the pH of the water by injecting a mild acid during the final minutes of an irrigation cycle can dissolve these deposits.
Your Seasonal Maintenance Checklist
- Spring Start-Up: Check all components, clean your filter, flush all lines thoroughly before the first watering.
- Mid-Season: Regularly check pressure, clean the filter, and walk the lines to spot any leaks.
- Fall Winterization: Drain all water from the system. Remove the head assembly and store it indoors. If you are reusing the tape, you can either leave it in place or carefully roll it up for storage.
The Economics of Drip Tape: Calculating Your Return on Investment (ROI)
Is it worth the investment? For any commercial or serious grower, the answer is a resounding yes. Let’s break down why.
A Practical Framework for Calculating Your ROI
Use this simple formula to see the powerful financial case for switching.
ROI = / Initial Cost
- Annual Savings: Water bill reduction + Labor cost reduction (less time weeding/watering) + Input cost reduction (less fertilizer/fungicide).
- Added Revenue: The monetary value of your increased marketable yield.
- Initial Cost: The total cost of all system components.
Sample Budget: Estimating the Upfront Cost for a 1-Acre Vegetable Farm
This is a sample estimate. Prices vary by supplier and region.
- Drip Tape (10 mil, 8″ spacing, 4′ between rows): ~11,000 ft = $550
- Head Assembly (Filter, Regulator, etc.): = $150
- Mainline & Sub-main Poly Tubing: = $300
- Fittings, Valves, Plugs: = $200
- Total Estimated Initial Cost: ~$1,200
While this seems significant, a 1-acre farm could easily save over $800 in water and labor in the first year alone, not including the value of a 10-20% yield increase. The system often pays for itself in the very first season.
Beyond Year One: Understanding Total Cost of Ownership (TCO)
TCO includes the initial cost plus ongoing maintenance and replacement costs. By choosing a more durable tape (like a 15 mil) and performing proper maintenance, you dramatically lower your TCO over a 5-year period, making the initial investment even more profitable.
The Drip Tape Troubleshooting Manual
Even the best systems can have issues. Here’s how to diagnose and fix them fast.
- Problem: Uneven Watering or Low Flow at the End of the Line
- Cause: Your rows are too long for your pressure, or the mainline is too small.
- Solution: Check that your pressure regulator is working. For future designs, ensure run lengths are within the manufacturer’s recommendation.
- Problem: Leaks at Fittings or in the Tape Itself
- Cause: Improper installation, animal damage, or high pressure.
- Solution: Ensure fittings are securely seated. For holes in the tape, use a specialized drip tape repair coupler. Verify your pressure is not exceeding 15 PSI.
- Problem: Emitters Are Clogged
- Cause: Filter failure or biological/chemical buildup.
- Solution: Immediately clean your filter. Flush the lines. If the problem is widespread, you may need to perform a line cleaning treatment (see Anti-Clog Protocol).
- Problem: System Pressure Is Too High or Too Low
- Cause: Faulty regulator, clogged filter, or a pump issue.
- Solution: Use a pressure gauge to test the pressure after the regulator. A reading above 15 PSI means the regulator has failed. A very low reading points to a clogged filter or a problem at the water source.
Frequently Asked Questions (FAQ)
1. What’s the difference between drip tape and a drip line (tube)?
Drip tape is a thin-walled, flat product ideal for long, straight vegetable or berry rows. Drip line is a rigid, round tube for permanent landscape installations like shrubs and trees.
2. How long does drip tape last?
It depends on the wall thickness (mil). 6-8 mil tape may last 1-2 seasons, while heavy-duty 15 mil tape can last over 5 years with proper care.
3. Is a filter really necessary?
Yes, 100%. A filter is the single most important component for preventing clogs and ensuring the longevity of your system.
4. What pressure (PSI) does drip tape need?
It operates on very low pressure, typically between 8 and 15 PSI. You must use a pressure regulator.
5. Can I bury drip tape?
Yes, this is called Subsurface Drip Irrigation (SDI). You must use a thick-walled tape (15 mil is recommended) and it’s best to bury it only a few inches deep.
Conclusion: Your Next Step Towards Smarter Irrigation
You now have a complete blueprint for understanding, designing, and managing a high-performance drip tape irrigation system. It is more than just a watering method; it’s a strategic investment in the health of your soil, the quality of your crops, and the sustainability of your operation.
By embracing this technology, you are taking control of your most precious resource—water—and turning it into predictable, profitable growth.
Ready to build your system? A great system starts with a reliable core. Explore the technical specifications of the Okdagro 16mm Anti-Clog Drip Tape and its full ecosystem of compatible fittings to get started.
Further Reading & Authoritative Resources
For those looking to dive deeper into the science and best practices of micro-irrigation, we recommend the following resources from trusted institutions:
Drip Irrigation for Vegetable Production – Penn State Extension
Drip Irrigation in the Home Garden – University of California ANR